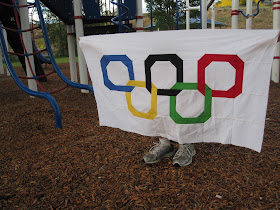
What better way to think about the Olympics than to try and draft those rings in EQ7 (Electric Quilt v.7 software)!
DISCLAIMER: This is not to be used for commercial purposes. Please respect the IOC's trademark. I do have permission to share this editorial and illustrative method for drafting my version of the image.
But, how would you go about drafting blocks so that you could get the effect of the Olympic Rings?
I've seen two ways of doing this so far, thought about a 3rd, but I will propose a 4th.

First, I was inspired by
Becky at Solar Threads tutorial who did this one, using Snowball and Bright Hopes blocks. Very clever and quick!
A few other quilts I have seen used cut rings and appliqued them on. Another created a ring as if it was a double wedding ring set of pieces and then intertwined them and appliqued it onto a whole cloth. Lots of handwork with these!
What about using the "Pickle Dish" block? I did draft it up, but given the intersections at the end of the arcs, it doesn't 'look' like a circle, but could work if you're a fan of that design (no pun intended :-)).
I'd like to get completely pieced rings. I wondered if I could adapt a "Drunkard's Path" block and make that work.
Here is what I came up with.

Using EQ7.
Worktable...Work on Block.
I used a 4" block, with snap points and graph lines of 20 x 20.
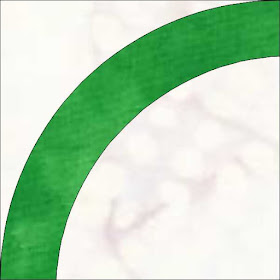
Draw an arc from corner to corner.
Draw another arc inside at the 4th graph line mark, it is at about 4/5". Save to Sketchbook.
You can color in the colorways of your dreams and save each one to the sketchbook, or just use an uncolored block saved to the sketchbook to then place in the quilt and color when you're on the Quilt Worktable.
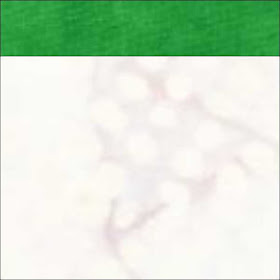
The sashing block is also easy.

Just draw a straight line at 4 ticks of your graph paper and save it to the sketchbook. (this is 4/5" of an inch. You don't have to worry about the dimensions of this, as long as it is relative to your other blocks it will line up. Save to Sketchbook.
I am only going to put a 0.5" sashing in the actual quilt so that the rings don't touch on a vertical axis when they are next to each other.
Now for the intertwined block.
Start with the arc block (re-draw it, or select if from your Sketchbook). Copy both arcs (select each arc with your mouse, holding the shift key down then Ctrl-C), paste (Ctrl-V), right click your mouse and choose 'Rotate' choosing 180 degrees. Now move the pasted rotated arcs to the opposite corner being sure that the end points hit the corner and edge of the block.
The only somewhat tricky part is to figure out which ring goes on top and which should stay on the bottom.
Save what you have to the sketchbook. Now each intersection has its own end point. Delete the lines where you want the ring to be on top. Looking at the picture below, at the lower left corner, there were two lines where the red ring is going behind the green ring, so I removed those. On the red ring, at the upper right hand side, there were two lines where the green went behind it. Save to Sketchbook.

This does leave little slivers of red and green, but you can color it in if you extend the background piece, or piece it, for real! Piece from the outside background corners towards the center.
To create the quilt, go to the Worktable...Work on Quilt.
Layout: Horizontal
Horizontal 6 blocks
Vertical 3 blocks
8" finished
Sashing: 0.5"
Borders: Top and Bottom: 7.5"
Left and Right: 4.75"
Quilt size result should be: 60" x 40".
Place the single arc/ring section block into all the outside blocks, except the lower left and right corner. Place the intertwined block in the 4 center blocks. Use the 'rotate block' button to then position the arcs properly and then color them in. Place the sashing block into each sash except the sashings on either side of the lower left and right corners.
I'm working on making this as I write, so there may be updates to this portion today if I discover any hints ;-)
Fabric Estimates for Top ONLY, add for backing and binding:
Background: 2 yards (note, need 41.5" minimum usable width of fabric (WOF)
Each color: 1/4 yard
Cuts from Background:
Cut 1 - 9" WOF
From this,
- Cut 2 - 9" square blocks
- Cut 1 - 6 7/8" x remaining WOF then cross-cut to get 5 - 4" x 6 7/8" pieces (use in sashings)
- Cut 2 - 1" x remaining WOF; cross-cut to get 3 - 1" x 9" strips (use for sashing spacers between rings); 5 - 1"x 1" squares (use for cornerstones in the middle of the rings)
Turn fabric and from the Length of Fabric (LOF)
Cut 2 - LOF x 8" (save for border)
Turn back and cut from opposite end of remaining WOF
Cut 2 - 5.25" x WOF (save for border)
cut 6 - 8.5" x WOF then cross-cut to get 16 squares (use with templates for the arc and intertwined blocks) There are two spares here.
Cuts from Colors:
Cut 2 1/8" x 4" for each color (used in the sashings).
Use Templates to create 3 arcs from blue and red, 2 arcs from yellow, green and black; sashing rectangles and 1 intertwined arc from blue and red and 2 intertwined arcs from yellow, green and black.
Create the arc blocks, then create the intertwined blocks, create the sashings. Layout your quilt so that you see all parts are ready to go. I pressed towards the arcs on all background vs. arc seams. With good quality white background fabric, you should be able to press towards the inner part of the circle on each block.
Sew the vertical strip together including the first column of blocks and the sashing to the right. On the righthand end, sew the last sashing and the final column together, then sew the column together and the bottom block will already include the sashings. Then sew vertical columns together and then add side borders, and finally the top and bottom borders.
The outer arc and sashing blocks are fairly straight forward.
I have printed a set of
templates (PDF, be sure to print with NO SCALING of the image) for the intertwined block based on an 8" finished block. Note the littlest piece cuts off at the point, but if you want it to line up with the edge of the block within the seam allowance, be sure to add another 1/4" to the end. You can use these pieces to figure out the other block if you want to go ahead and make it for yourself and don't have EQ. Cutting the fabric out as templates and then sewing together is the easiest way. There really isn't an EASY way to do this, as far as I can tell. Sew a corner to the tiny piece, and then the arc. Do both corners. Sew one center to an arc corner set being sure to stop at the seam allowance. I set the templates together and made markings where each piece starts and stops to help for placement. Sew two arc sets together (stop at 1/4" ends), leaving the partial seam to come back and finish. The partial seam is necessary.
Please note: you are welcome to use these for your personal use only. Olympic trademarks may not be used for commercial purposes.
Thanks for reading!
 First, I was inspired by Becky at Solar Threads tutorial who did this one, using Snowball and Bright Hopes blocks. Very clever and quick!
 Using EQ7.
 Just draw a straight line at 4 ticks of your graph paper and save it to the sketchbook. (this is 4/5" of an inch. You don't have to worry about the dimensions of this, as long as it is relative to your other blocks it will line up. Save to Sketchbook.
 This does leave little slivers of red and green, but you can color it in if you extend the background piece, or piece it, for real! Piece from the outside background corners towards the center.


YEA!!! How cool! Thanks for the plug, and the tutorial!
ReplyDelete