Sunday, August 30, 2015

Island Batik - Summer in the Country Blog Hop - Haystack Christmas

 Summer in the Country Blog Hop. - Day 14

Welcome!!

This is part 2 of my participation. I hope you enjoyed the post (Part 1) on 18-Aug (Day 2).

When I originally thought Summer in the Country and was looking at these fabrics, there were a couple that just said--Christmas in July. But we're doing the blog hop in August, so that wasn't quite right, but I just couldn't get the thought out of my mind.


So, I have a little Christmas in July concept, that has now been adapted to be a wall hanging that could be thematically decorated for any season. The other fabrics were used in examples shown in my Part 1 blog post from Day 2.


My primary fabrics are three SKUs; two from Green Acres and one from Countryside. I've thrown in a few other bits for the inner borders, and a woodgrain fabric for the frame.


You won't see the reindeer in this first image below, but it becomes the feature next.


This stack of hay bales next to the barn, has a cat and a dog (ok, maybe they really are a cougar and a wolf, but in this context I think they work as happy farm animals) and some bushes and grassy areas and even a bit of dirt road leading up to the haystack.

I created the cornerstones of the sashing by making 8 half square triangles (HSTs) at a time (you can find this technique taught by Eleanor Burns at Quilt-in-a-Day and also in my new co-authored book You Can Quilt: Building Skills for Beginners. Yes, they are small, but using this method they came together beautifully. This helps to give dimension to the bales. They are finished HSTs - 1/2" square; start with two 3" squares. The beauty of doing them this way, they all finish without bias edges.

The hay bales are cut 6.5" x 3.5" and the sashing is cut 1". I did improvise the inner borders (around the hay bales basically...and when trying to add the final woodgrain fabric border, it became clear that I hadn't kept things very straight, so had a few adjustments to make. If you want to improvise...just be careful to keep it squared up.

With the help of two of my friends, Nancy Goddard and Julie Tapley, we have seasonal decorations to hang on the hay bales. There are a variety of ways that they could be attached, including stitching a loop into the top of each bale --either in the piecing process or by hand after it is quilted. Then all 'ornaments' can be hung traditionally. A hook and eye mechanism --put the eye in the strategic spots and a hook on all 'ornaments'. Since some decorations may not be desired in the same locations all the time, perhaps a sticky Velcro system would allow for easy movement (Thanks to another friend, Linda Roberts, that for that suggestion). I'd love ideas for solutions!

I really knew next to nothing about doing machine embroidery. A couple of key things I learned through this experiment--there are designs that are rated for stand alone (i.e. it would make a patch) ..I don't think we used any of those, so a few of these are quite delicate, but they will work for this illustration. We also tried using a water soluable interfacing. Some worked better than others. You'll see on the spider webs that a clear film developed when it dried. That helped the stitching stay together even though it wasn't a design intended to be used in this way.

Here is the first concept -- Christmas in July ....or just really at Christmas!

Then a 4th of July celebration might look like this:

or consider many other seasons


Snow time --I always think of January for snow --used an Aurifil variegated thread for this one.

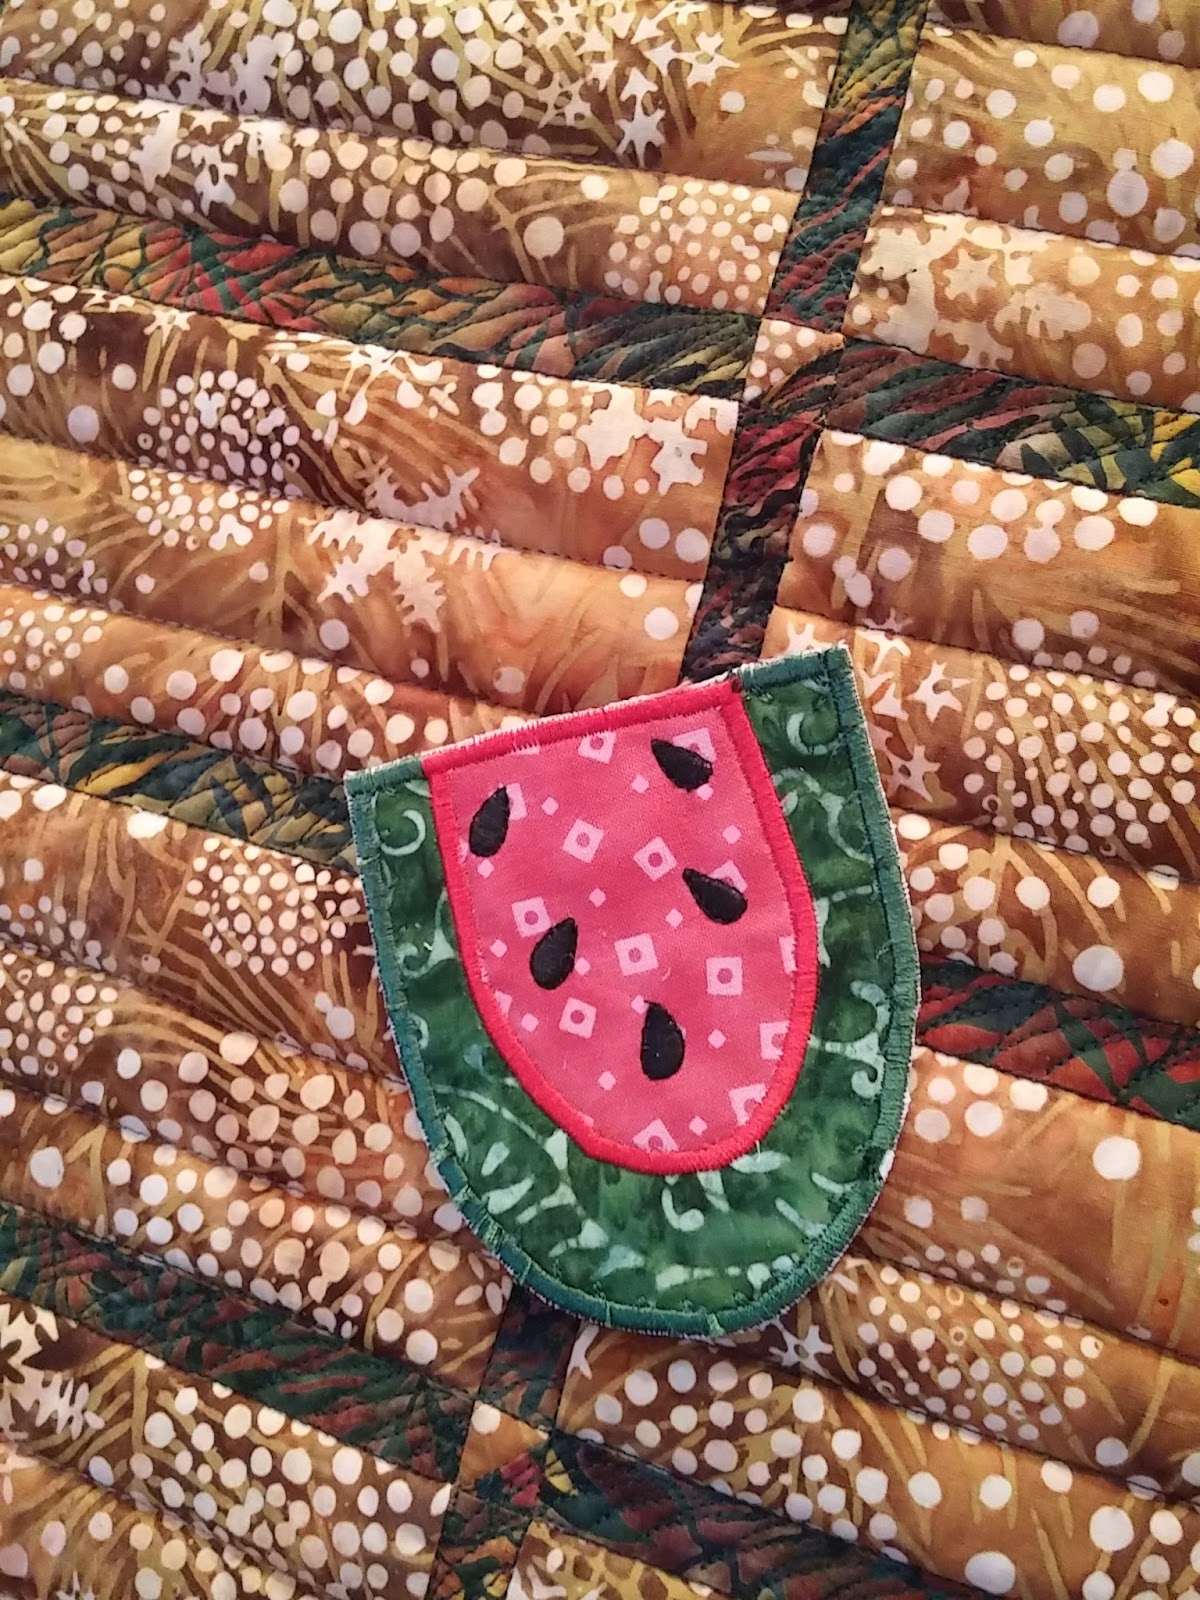
Appliqued onto polka dotted fabric for this heart.
Valentine's Day in February


St. Patrick's day in March or                Easter Eggs ...sometime in the spring


Watermelon for summertime fun or even something hand made using my Queen of Hearts accuquilt Go! die and cutter and a few hand stitches with Aurifil 12 wt thread.


and how about the fall ....or Halloween.


Even thought a 12 Days of Christmas idea would be fun or even a countdown to the start of school. On the backside of the Christmas ornaments, use a nice light neutral fabric so you can write a number or use a fabric with numbers or print them yourself. Then stitch out a school house and let it be a fun countdown to school.

Now for this very yummy recipe!

Lemon Berry Bars

This idea developed in my childhood and continues to evolve. Start with a Russian Tea Cake recipe. Don't make the 'balls', just put the dough in a pan and bake it. Cool. Add a lemon pie filling and top with berries. They could be fresh berries or make a compote.

I chose to try using almond flour instead of wheat flour (often I use part wheat and part white flour). I have many friends and think I myself would benefit from minimal gluten, so have started experimenting with other flours. It actually turned out great.

Russian Tea Cake mix for the 'crust'


Mix:
1 cup soft butter--just let it sit out for a while (I tend to use butter with olive oil premixed)
1/2 cup Powdered Sugar
1 teaspoon Vanilla (I used some awesome Mexican Vanilla)

Sift and stir in:
Flour (I often use 1 1/4 c whole wheat flour and 1 c white; this time I used 2 1/4 cups Blanched Almond Flour - Gluten Free! ....and no sifting actually occurred, but you get the idea)
1/4 teaspoon Salt (I used Sea Salt)

Mix in:
3/4 cup Almonds (calls for chopped nuts ...I just put the whole almonds in --while mixing it broke them up a little bit, but not much, I like the crunch!)


Spread into a pan (use a bigger pan than this! unless you love a thick crust)


Fresh out of the oven.

Yes, it fell, but that's ok. This made for a very thick crust --my weakness I realize, so it would probably be just fine in a larger pan and make for a bit thinner crust --it will go farther when serving it.


Lightning Lemon Pie filling

(this is from a recipe book my mom had in the 1970's) I wrote up a recipe card while in a high school foods class circa 1980.

Super simple ingredients --powerful punch!

Stir together until it thickens (beat it!):
1 can Sweetened Condensed Milk --I notice that the can purchased at Costco recently is an ounce less than what they were in the 1970's!
1 teaspoon grated lemon rind (zest!)
2/3 cup lemon juice -- fresh or ReaLemon


Spread on cooled crust.


Add Fresh Berries when ready to serve or make a compote and chill before serving---I used rows of fresh raspberries (they were huge! --those Driscoll berries are grown where I was born) and blueberries.


Cut desired size and garnish with a fresh mint sprig if you'd like!


Hope you've enjoyed these ideas! Leave a comment below to be entered into a fabric giveaway of all three of these primary fabrics (hay bales, sashing and reindeer ornaments). Be sure I can contact you if I select your comment randomly on Sept. 7.

Any ideas for how to attach the 'ornaments' on the hay bales?


The next blog in the Summer in the Country Blog Hop is Be A Quilter.

Use the Rafflecopter below for the main Island Batik Giveaways.

a Rafflecopter giveaway

My next blog post will be on 1-Sept as part of the EQ Seasons Row-a-long. Tutorials of how to draw rows featuring the four seasons and lots of giveaways. You do not need to have the Electric Quilt (EQ) software, but you might be inspired to enter to win it. My design will be a new paper piecing pattern incorporated in two sizes into a beautiful Spring row. See you then! Join this Facebook group if you'd like to get additional support for the EQ Seasons RAL.

Update 9/7:
Giveaway is now closed.
Randomly selected winner is Anita. You have been sent an email requesting your mailing address.

Thank you for all the 'fastening' ideas!

Tuesday, August 18, 2015

Island Batik - Summer in the Country - Woven Braid and variations

Welcome! Day 2 - This is Part 1 ...of my participation in the Summer in the Country Blog Hop. Part 2 will come on 30-August, I hope you'll stop back by and see some fun home dec inspiration with more of lovely Island Batik fabrics.


I'm excited to share with you a new chapter in my quilting journey. This is a long post, but intended to be informative and inspiring. I'm sharing some history about how this particular chapter got started, my new design, several variations and a wonderful summer salad using fresh ingredients from your garden. Be sure to comment with the ability to contact you if you'd like to be eligible for the giveaway. I hope you enjoy!

A bit of back story:
I had met Jayme Crowe of Bella Nonna Design Studio some years ago because her hometown is Walla Walla, Washington (I lived in the adjacent town at the time) and she often returned to visit with her parents. She graciously agreed to meet for a tea one day after the 2nd guild presentation she had made in a few years to our local quilt guild. After our meeting, there were several takeaways for me, which included some critical insights about how 'market' works. Although I had self-published a few patterns to date, the marketing aspect of getting patterns sold is just not a personal passion of mine and I didn't see myself ever having my own booth at market for a variety of logistical reasons. So I needed to find a better way to get my patterns out there.

In 2014, Sochi Olympics had a logo design that reminded me of Bella Nonna Design Studio's Boondoggle Ruler--at least it would be a representative shape to make a quilt based on that design. Jayme sent me some of her rulers to try and I also designed several patriotic patterns using the same shapes using the Quilted in Honor fabric line from Island Batik. These are currently available as pdf download in the Dangling Diamonds pattern at Craftsy--the Boondoggle Rulers are required.

Camouflage Canopy                                 Flag                                  In Memory (or Memorial Garden)


 Flyover

 Remember this...you might see them again this Fall as a package with my latest design!

Back in 2009, Nine Patch Media's Elizabeth Phillips, was a central part of the Rose of Sharon EQ7 design challenge. One of my blocks was chosen for the book and another for the DVD. There were several occasions through the years that I would run into Elizabeth at various industry functions, including the Quilted in Honor fabric line and initiative with Island Batik.

Many things came together last fall in Houston at the International Quilt Market.

Jayme Crowe and I shared a hotel room and she had just become a new fabric designer for Island Batik. She encouraged me to talk with their team about some of my pattern designs, specifically the ones I had done with her Boondoggle Ruler. A meeting with Island Batik representatives did occur and I learned a bit more about the submission process of pattern design ideas. Island Batik is also now representing/selling patterns that showcase their fabric lines through their sales reps. I was invited to follow up after market. I was given electronic images of the upcoming Spring lines of fabric and asked to submit designs. After careful consideration of the particular collections, I submitted designs and one was accepted -- Woven Braid using the Spring 2015 Meadow collection - specifically using the purple and green hues.

Introducing "Woven Braid" a new pattern with the Island Batik Meadow Collection


How Woven Braid became a reality:
The turn time was quick on getting this stuff ready so it would make it into the Island Batik catalogue for Spring Market...so my Christmas break with my sister and family in California meant I was piecing at the dining room table during any spare time we had. I got towards the bigger logs and wasn't pleased with the coloration steps that were going on. Sometimes the evolution of the process of seeing fabrics only in electronic form and batiks are such a hand process that what you end up with in reality may not be exactly what you anticipated.

I even put it into a black and white version to check for the valuation shifts that I was hoping for. Nope, I just wasn't satisfied.

With this coloration situation and my own screw-up from the original design --reversing the whole scenario--I had to put it on hold and wait until I got home to continue.

Katie at Island Batik was fantastic in working with me and sent several other fabrics that would likely work. Here I am auditioning the selections to make a final decision.


 and finally the blocks are ready! The fabric was a dream to work with!


A fun almost stained glass effect when it is back lit.


Now to decide on the quilting. There is a secondary design going on here ...the lights and darks going up to the right (vs. green and purple going down to the right). Another border to go....but thinking about the next step already!

Considering threads ....need to get it done quickly so ultimately going with something simpler, probably could have even done it with a single color.

Starting with the border --the outer border was cut very strategically to maximize the visibility of the sunflower motif. I chose to just stitch the motif and transition between each flower with a winding stitch to the next flower. Really helps the flowers pop.


Stitching lights vs. greens and letting the fabric do the purples vs. darks. I wasn't sure part way through if I had actually pixelated the 'greens' stitching perhaps one pixel off, but I kept to whatever I had started with in order to be consistent.


This photo shows the ribbon candy in the dark purple border.

I filled in the background with 1/4" straight line echo just to keep it simple and help the braid to really pop.

Hindsight....consider a smaller 'braid' size and/or another way to stitch the 'braid'. Here is a sample of a 'rope' that I stitched recently on a Tula Pink Anchors Aweigh design. This rope effect is quite easy to stitch out.


That wasn't the end of this drama.....while blocking it I discovered that the backing fabric that I used was a 'bleeder' and came through all the stitching lines on the quilt while it was drying in the blocking process. I had to re-soak it with products to suspend the extra dye and remove it from the quilt. WHEW ...but took a bit of extra work and lots of nerves. At some point, I might learn to TEST all fabric before I get started using it. It is a hard lesson to learn though as this is not the first time I've had this happen to me. I just get too excited and want to get into the piecing process ASAP!


The Meadow collection is scheduled for delivery to quilt shops in August. I hope you'll ask your local shop to order it. I've already got pre-orders for kits of this quilt requested in my own shop, so have put my order in so that I'll be sure to have it as well. If you stop by for Row by Row in the latter part of the summer --you will have the opportunity to get a kit yourself!

Please contact me or request a response in your comment if you'd like one. I'll then work with you privately through paypal to complete your transaction.

This blog hop features other Spring and Summer collections as well. So be sure to check them all out.


These last photos are courtesy of Island Batik and were used in their Spring 2015 catalogue. Ask your local quilt shop about these fabrics and this Woven Braid pattern.


Here is their webpage featuring the Meadow collection.
www.islandbatik.com


Here is one alternate layout that is included in the pattern using a variation of the Meadow Collection used in the original for the 'First Light - baby size' pieced by Nancy Cargo. Quilted by me with a 'Dancing Violets' pantograph design. This variation had only a single dark green (from Green Acres) in the last log so the vertical is more defined than the design calls for.

 
Here is a closeup of the two blocks in an alternate colorway in brown and green. They include fabrics from several different collections featured in the Spring and Summer releases including Green Acres, Countryside and Bar-B-Q.


Here is the
'First Blooms - full size' - made by Julie Tapley. Careful attention in the borders to get the animals all right side up and the corners have fussy cut on point squares. Julie also quilted this using her embroidery machine and putting unique animal designs throughout the quilt.


and  'Stacked Bricks - lap size' pieced by Nancy Goddard, custom quilted by me with three different fills --a woodgrain with lots of knots, pebbles and a bark texture with no knots and in the opposite direction from the woodgrain; each motif changes at each brick. There is a fern design in the inner border and large trees in the outer border. We used a wool batting in this one. This allows the quilting to be much more visible, but doesn't drape as well so hard, especially on a windy day, to get a flat shot of it.
Summer Garden Salad

As this is the Summer in the Country blog hop, I'm sharing a wonderful Summer Garden Salad that is really a collaboration with the 'baby size' example maker - Nancy Cargo. I'm so grateful for her wonderful garden proceeds which inspired this particular delight.

1 c mayonnaise or salad dressing
1/4 c sugar or sweetener alternative
4 tsp vinegar or lemon juice
1/2 t dill weed
1/2 t salt
4 med cucumbers -- peeled and generous dice  (about 3 cups)
4 med tomatoes -- generous dice (about 3 cups)
3 green onions chopped -- be generous
Oregano to taste, add basil if you'd like
Feta Cheese (optional)


Combine mayo, sugar, vinegar, herbs and salt if desired; mix well.

Notes: I chose to use Vegenaise -- a mayo alternative. Salad dressings may have their own flavors that will be stronger than the individual herbs added in the recipe. Less amount would also be ok.

I used Agave Nectar for my sweetener (adjust portion accordingly)

The yellow balls on the plate are Lemon Cucumbers. Any cucumber would work.

We had dried dill on hand, but fresh dill would be lovely as well.

I especially loved the feta in this and the fresh garden flavors.

Add cucs, toms, feta and onions; toss. Cover and chill about an hour.
Long term refrigeration will cause water in cucumbers to separate.


This serving is garnished with some fresh basil.


Thanks for stopping by! I look forward to your comments below if you'd like to win some Island Batik fabric and a free Woven Braid pattern. Which layout interests you most?  (Woven Braid, First Light, First Blooms or Stacked Bricks) Which colorway do you prefer? (purple/green or green/brown). I've put together 4 - four fabric bundles to giveaway. Each bundle recipient will also receive a Woven Braid pattern.  Random #s will be drawn on Sept. 7, 2015.


Tomorrow's stop if from Connie at Kauffman Designs.

Use the Rafflecopter below for the main Island Batik Giveaways.
a Rafflecopter giveaway

Update 9/7 : Giveaways are now closed.
Randomly selected comment winners for my bundles and the Woven Braid Pattern are:
Dolores, Anna, Connie and Sarah -- all 4 of you have been sent emails requesting your mailing address.