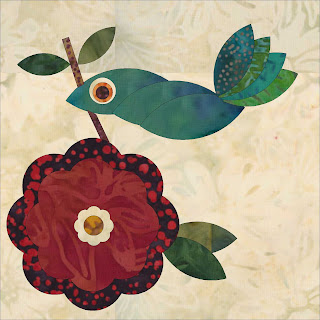
 As part of Beaquilter's EQ Applique'd Animals Blog Hop, I wanted to share with you how I came up with this spring time bird using simple shapes during the EQ6 Rose of Sharon contest back in 2009. This particular block was selected to be included in Nine Patch Media's DVD, a companion to the Rose of Sharon Block Book published by Martingale & Co. (That Patchwork Place).
Part of the challenge was that we were limited to these shapes and the given sizes.

Within the contest instructions, there was a suggestion to think outside the box. A traditional Rose of Sharon block, is typically just the flower and leaves and stems.
Using the leaf shapes allowed me to create a body and feathers, and the circles created the eye.
I want to show you some tricks in using pre-sized shapes.
This PJ6 file is available on the EQ site and includes the original fabrics in the challenge. You can also download all blocks submitted by contestants. They are for personal use only.
http://doyoueq.com/project_download_categories/rose-of-sharon-block-downloads-instructions/
From the project sketchbook, select 'blocks', then the image as shown above which has only the shapes and multiple sizes. Click on the 'Applique' tab at the bottom of your screen.
Select the single arrow at the top of the left side navigation. By holding your mouse button down in the top left corner and dragging it to the lower right, select all shapes and drag them off the block (i.e. to the right).
This block is 12", and the shapes are sized accordingly to work with the stencil set available from Nine Patch Media or the die shapes from Accuquilt. There are two separate die cutters to get all the sizes.
http://www.accuquilt.com/go-rose-of-sharon-by-sharon-pederson.html
http://www.accuquilt.com/go-rose-of-sharon-2-by-sharon-pederson.html
Note: If you want to enlarge the block size, you'll need to consider the shape size adjustment that occurs when enlarging your block within EQ and adjust which shape sizes you use from a stencil or die system. You can also print your own templates from EQ.
Since we were limited to use only these sizes, I stayed with the 12" block. Having moved them off the block, I could select, copy, and paste each shape I wanted to use, and always had my original palette of shapes to the right of the block. After saving each block to the sketchbook, go back and remove the original applique shapes to the right of the block if you want to use that particular block in a quilt setting.
Select a leaf size, copy, paste and then move it and right click to select 'rotate'. Choose how many degrees you'd like to rotate it, and then move into a final position you'd like.
By using the 'copy' and 'paste' from the right side shapes, you always still have the original set of shapes to work with.
The stem of the rose is created by drawing a straight line. Using the 3rd icon on the left side navigation which is a pencil drawing a straight line. Select the pencil, then click at your desired start point and drag it to the end point. If the lines do not create a 'closed' box, then no applique piece will be created. Be sure you draw the ends in as well. If you want the templates that you print to allow for some 'under the leaf' stems, draw them longer, and then be sure the leaf 'order' is brought to the top.
Block...'send to front' or the icon across the top navigation that looks like multiple pages with a green one on top or a green one on the bottom and arrows, showing front or back. If you hover on the icon it will say 'send to front' or 'send to back' accordingly.
Here is what I finally made, on a 15" center block. I wanted it to have perspective of looking through a very thick wall. I've called it 'Rose of Hope' ....a great thing to see if you've been inside all winter!
 I hope this has taught you a few new ideas. Leave me a comment by end of day April 26 on what you learned from this post and you'll be entered into a drawing for a Quiltmaker Quilting Designs
CD, this is volume 2! Thank you Electric Quilt! The winner will be notified by Monday, April 29.
Below is the schedule for the week. Hope you'll visit us all.
Monday April 22nd
Seamstobesew (Summer Animal)
Freemotionbytheriver (Critters and Bugs)
Sewincrediblycrazy (Critters and Bugs)
Beaquilter (Summer Stuff)
Tuesday April 23rd
Kissed Quilts (Summer Animals)
Seamstobesew (Critters and Bugs)
Funthreads (Summer Stuff)
Wednesday April 24th
Funthreads (Summer Animals)
Patchworkbreeze (Critters and Bugs)
Beaquilter (Critters and Bugs)
Sewincrediblycrazy (Summer Stuff)
Thursday April 25th
Beaquilter (Summer Animals)
Janesquilting (Critters and Bugs)
Seamstobesew (Summer Stuff)
Friday April 26th
SewCalGal (Critters and Bugs)
Electricquilt
Update 4/29/2013 -- KDBrown was randomly selected to receive the Vol.2 Quilting Designs add-on. Congratulations!!
Thank you to all the hoppers who stopped by, Cheers to your new designs!
Update 4/29/2013 -- KDBrown was randomly selected to receive the Vol.2 Quilting Designs add-on. Congratulations!!
Thank you to all the hoppers who stopped by, Cheers to your new designs!


Wow, that's really nice, I'm definitely going to try the technique. Thank you for sharing it.
ReplyDeleteMarian
http://www.seamstobesew.com
What a beautiful wall hanging and technique!
ReplyDeleteThanks for great ideas. Using different patterns to make different things is a great idea.
ReplyDeleteI wouldn't have thought to use the leaf shapes for the body of a bird. Great idea!
ReplyDeleteGreat imagination, to be able to pull a bird out of odd little shapes :) She's so cute
ReplyDeleteI don't think I would ever be able to learn to use this system! I'm so challenged even by a candy machine!! LOL! Love what you did with the Rose of Sharon block! so cute!
ReplyDeletehulseybg at gmail dot come
Not being a user of EQ products, you have enticed me to learn more & perhaps getting the system! Thanks!
ReplyDeletewow you are very creative. I love what you did with just simple shapes. Your block is wonderful and very springy. Thanks for the tips. I dont have one now, but have been thinking about it.
ReplyDeleteI love the dimensional look of your block and your quilting is just beautiful. I am amazed at how different shapes can be used for creating a whole different design. Cute little bird. You make it seem very easy to use the EQ. Thanks for sharing.
ReplyDeleteEven using such simple shapes by thinking outside the "box" you can still come up with original designs. Thank you for sharing this with us.
ReplyDeletesyvisser@gmail(dot)com
What a great block! Thanks for sharing the technique on how you created it!
ReplyDeleteThanks for the great tips of using presize shapes!! You make it look easy!
ReplyDeleteI love it! And your quilting are amazing! Thanks for the Tutorial! Have a nice day!
ReplyDeleteIsn't it amazing how limitations (only being able to use a few shapes) can really drive creativity? I love it!
ReplyDeleteYour quilting is fabulous - I especially love the light border!
I have never used EQ so this post alone is all new to me!! I think if I win I will have to follow this tutorial again so I can actually try to figure it out! Thanks for the chance.
ReplyDeleteSuch a cute block, no wonder it was selected to be included on the dvd. The thing I learned was that by using the copy & paste function it keeps the original set of shapes. Very convenient if you want to start over.
ReplyDeleteI've always loved your Rose of Sharon block. So sweet. Thanks for sharing how to create it. I definitely want to do this.
ReplyDeleteSewCalGal
www.sewcalgal.blogspot.com
Thanks for sharing how to use simple shapes to make such a good looking design!
ReplyDeleteSo creative!
ReplyDeleteLove the birdie with the Rose of Sharon block.
ReplyDeleteThat's a really neat trick. I love how the leaves made such a great bird body.
ReplyDeleteThanks for sharing your creative process. You did a great job, and the sew out is very pretty!
ReplyDeleteI learned that there are alot of things you can do with EQ and it looks like it would be fun. Thanks for the giveaway!!
ReplyDeletesmjohns63 at yahoo dot com
I've never designed appliqué blocks with EQ before,so I learned a lot. I'm going to bookmark your post for later. Thanks!
ReplyDeleteI learned that I can select shapes and drag them off the block to use later by copy and paste, or cut and paste. I did not know that was possible. But as I am finding out, there are so many things EQ can do that I may spend years learning it all. Thank you.
ReplyDeleteI've never used EQ but I learned how to create depth in the bordering frame from looking at your block. It's very striking!
ReplyDeleteDidn't know that you could move the applique shapes off the block so you could create your own design one shape at a time by selecting, copying and pasting.
ReplyDeleteThank you for sponsoring this giveaway.
Would love to have one to play with thanks
ReplyDeleteAwesome way to create your own design using the shapes. Love your quilting - looks like it's in a frame!
ReplyDeleteLove the idea of using the leaf shape appliques for the bird. Very creative and a great tutorial
ReplyDeletenice block thanks for sharing
ReplyDeleteWhat a fun challenge! I learned to drag the shapes off to the right and then they are available to use without being in the way. Thanks for the tutorial and giveaway!
ReplyDeleteWow, I have EQ7, but haven't tried the appliqué. I learned that it's possible to make a very creative block with very basic shapes. Thanks for the great tutorial!
ReplyDeleteVery nice block. I havent tried applique in EQ7 now I am going to have to give it a try
ReplyDeleteI haven't used the applique section either, so thanks for the introduction - I love the bird made out of leaves! What a brilliant idea.
ReplyDeleteThis is all new to me -- before this hop I didn't know anything about doing applique in EQ. Thanks for sharing your tips and your lovely block!
ReplyDeleteI have learned a lot about applique during this blog hop. Thanks so much for being a part of it!
ReplyDeleteThank you for sharing your knowledge on the use of EQ.
ReplyDeleteWow, Marlene, I learned how quick and easy it is to make a bird out of simple shapes. Great job!
ReplyDeleteI've never used the EQ so I'm so excited about what it can do for me. I would love to win and start creating as soon as I load on the computer. Thanks so much for the chance.
ReplyDeletencjeepster@aol.com
Wow, I love how you made the bird, it's wonderful.
ReplyDeleteThanks for the chance to win! I love the block ;)
ReplyDeleteI'm overwhelmed with all the options of EQ. Absolutely amazing. Thanks.
ReplyDelete