
To be honest, this isn't the type of challenge that I got excited about. After hunting high and low for inspiration since I really prefer to ONLY quilt on my long-arm, I was drawn specifically to an image from Hey Let's Make Stuff (with full tutorial) here:
We also had a suggested size of 36" x 36". When Leah Day's block print arrived in my box, I got really excited and thought maybe that is something I could use in this project.
After using my EQ7 and starting with an 8" block as the 'center' of the flower, I used 4" finished strips to build out the block and make something similar --definitely inspired by HLMS's.
Here are some step by step images of how I did this. My biggest NEW element was to use Bosal fusible foam. (I have this on a roll and you can buy it from me by the yard!) I thought this would help stabilize each piece of fabric as I added it by fusing it lightly right on the long-arm. As it was my first time and I couldn't find anything online for doing this type of technique, I learned a few things I'd do differently. And I do think it worked really well, so I will likely do it again!
Mark a grid, even if it is just on the edges so that you have an idea where you're at to keep things sized properly. While your hopping foot is intended to be 1/4" and you've cut your fabrics correctly so it should all stay quite square, quilting will always begin to distort things.


 I carefully placed my 'center' block and lightly fused it --making sure the iron did not touch the foam since that is where the fusible is and would make the iron sticky. If you were concerned, you could use a pressing sheet or piece of parchment to help avoid any mishaps.
Now, baste about 1/8" from the edge the center square. Given the size I did do it on all 4 sides.

Now, I began to add each strip like a log cabin style. Since I had pre-cut the strips it helped me keep things in order. After each strip was stitched down (right sides together), then open the strip and press it to stabilize it before proceeding to the next strip.

 When I got to the purple strips and I wanted to 'point' the ends, then I had to add a half square of background and then open it up.
Don't forget to keep the backing at the sides 'taut' --I didn't at one point and, yes got a slight pucker on the back, so important to maintain good skills, despite using fusible foam as the batting.
Ultimately, just keep adding in the order of progressive size.
Since the vertical pieces got quite long relative to my quilting space, I chose to make sure my longest edges were the top and bottom. --it wasn't designed that way, but another little tip that I sorted out as I went.
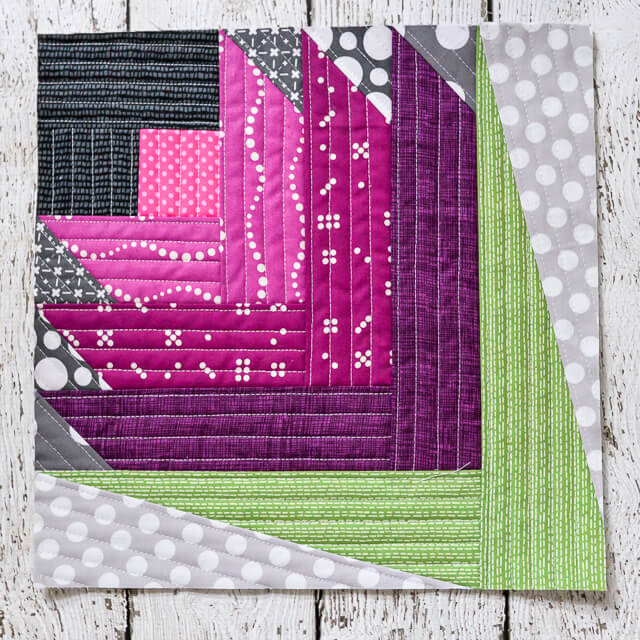
With a shot of the entire block, it looks like it might be a 12" block but the purple block print is 8" finished!

A pop of color on the binding seemed like a great idea and I found in my box the purple that is the same as the center block and I had some green in my stash that gave it just a bit of highlight and in a similar colorway as the greens.
To do a 'faux piped' binding, cut the piping color about 1/4" larger than the 'binding' color. In this case I wanted a 2 1/4" binding, so I cut the piping 1 1/4" and the binding 1 1/2". I needed more than 3 strips per color. Sew the same color strips together end to end on the diagonal. Then sew the two colors together lengthwise. It helps if the same color joins are offset from the other colors joins.
Fold it in half lengthwise and the piping will stick out about 1/8" since we cut the two fabrics 1/4" different from each other. If you want it to be less or more, adjust the 'difference' accordingly.
Attach the binding with the 'piping' color on top to the back of the quilt.

At the corner, I like to stitch off at the angle to the corner. That helps to fold the binding up correctly, then fold again just inside the edge of the quilt and start stitching from the edge.


The join of the binding might be the trickiest --need to try to line up the color change as well as the normal way that you join your binding. My method is described in detail in my co-authored book, "You Can Quilt!".
Turn the binding over the edge to the front of the quilt and 'ditch' it in the piping color.
so for scale ....you can see how big it is along the stair rail

Thanks Island Batik and Leah Day for this fun block print! Here is my Love Thistle (HA!!)

#islandbatik
#qayg
Enjoyed seeing the construction of this quilt on your long arm.
ReplyDeleteIt just looks awesome I need to try that binding method
ReplyDeleteInteresting. I would not have thought of doing it that way, but it worked just fine! Lovely little hanging.
ReplyDelete