Excited to be a part of this
EQ Seasons Row-a-long (RAL) and provide you with a Spring row.
Thanks to Marian at
Seams to be Sew for organizing this RAL Blog Hop and all of our many sponsors. You're going to learn a lot and get lots of inspiring ideas for all seasons.
Special thanks to Northcott who sent me the sky and tree (Stonehenge, Woodland) fabric to work with. I've also got the entire Toscana line of theirs, so have made my row entirely with Northcott fabric. I've got one kit to share with a lucky winner and am willing to ship kits if you're interested in purchasing one.
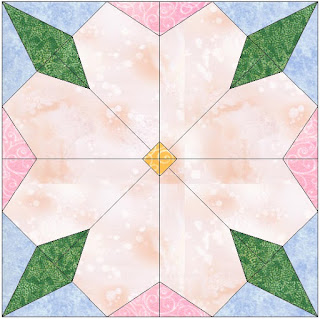
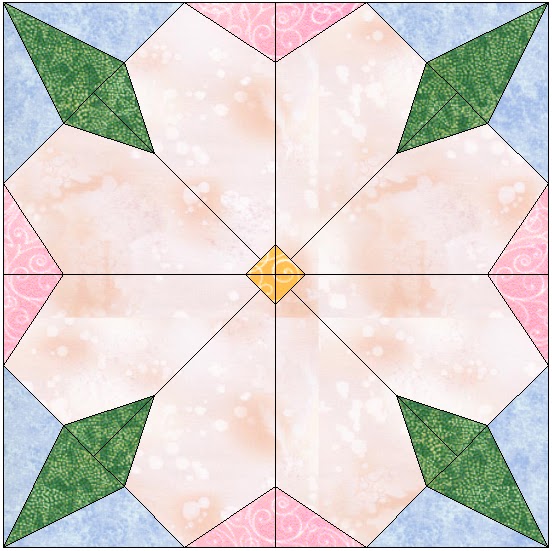
I've had this dogwood paper piecing design for a long time in EQ, but have never moved on with the design and made something. This seemed like a great way to give it a try. Just a row, could be a nice wall hanging or part of a bigger quilt.
Several techniques are used to make this row --Rotary Cutting, Paper Piecing and Templates.
Helpful tools to make it include: Rotary cutter, mat, ruler, foundation papers, add-a-quarter ruler, template making material or cardstock.
This row is 60" x 8" finished. That doesn't make an equal number of squares.
If you want to create this in EQ7, start with New Quilt, Horizontal. Click on the Layout tab (lower left of your screen) and then in the pop up window select 7 Horizontal blocks; 1 Vertical block; Finished size of Blocks are 8".
Select Border tab .....Remove check mark 'All', adjust top, right and bottom borders to 0. Make LEFT border, 4". This would be the place to add another border if you just want to make the row and finish it with a nice frame.
Select Layer tab. It should now look like this.
Block 1 is the 'Left border' 4" block.
Blocks 2, 6, and 3, 5 are similar but 'reversed'. To create these, go to Block, New Block, Easy Draw ...Draw the first block with a branch. Save to Sketchbook.
Select branch lines (click with your mouse on the line; hold your shift key down and select the second line as well), right click with your mouse and select 'Symmetry', use Flip H (Flip
horizontally). Select the 'Color' tab to be sure the lines connected to the edge of the block. If so, save to Sketchbook. If not, go back to the original branch block and try selecting, and flipping again. Be sure to check that the ends are connecting to the edge of the block before going to the 'color' tab. Save to Sketchbook. Note...you don't actually have to draw the flipped block. Just place the first branch block into the quilt in all 4 blocks where it will be used then from the tool bar select the 'flip' the blocks according to how you want it to be.

Block 4 and 7 have the same dogwood block, but one is 1/2 scale of the other. I drew the big one first so I could get the accuracy easily. This is a 2x2 grid block. I used a 12" drawing table block, 36 snaps both horizontal and vertical. Draw vertical, horizontal and diagonal lines both directions. Because this is paper pieced, I've used these guidelines to help create symmetry and a bit easier to piece the strange shape I am trying to create. Dissect the corner to create the edge of the petal. Make similar lines to give it the divot for both the petal color shift and the leaves.
In the center, this visual shows no diagonal line, but you will need it there to more simply create the petal section patterns. If you remove it the foundation pattern will print it out separately, but it just adds more paper and isn't necessary. Ultimately don't add the yellow corner until you have joined two petals together, then do it as a single combined corner. Save the large dogwood block to the sketchbook.
To create block 4, I changed my snaps to 72 (H and V) then selected the whole block, right click -- 'Resize' and choose 50% for both Horizontal and Vertical. Then move to upper left corner. Add the branch elements to mimic the original branch block and add another branch out to the small 4" dogwood. Save to sketchbook.
Place each block in its respective place back on the Layout tab of the quilt. Note that the first (border block) and the far right block are just fabric.
Fabric Requirements:
Sky/Background: 3/8 yard
Trunk/Branch: 1/4 yard (fat eighth will work)
Remaining pieces can likely be made from your scraps. If you're buying fabric, get 1/8 yard for each described below:
- Dogwood petals--Choose several values (light to dark) to make whatever color of dogwood you're used to seeing.
- Leaves
- Pale yellow for centers
8 Blocks ...numbered 1-8, left to right.
 |
| 1 2 3 4 5 6 7 8 |
To print the various instruction types, select the block while in the quilt layout, then File...Print and choose the desired method of pattern. The tool bar print icon will also give you these various options. Sometimes using 'landscape' mode makes for a nicer printout, sometimes using the 'move' option to move the different parts around on the paper is also handy. Change the 'printer' to Adobe PDF if you want to create a PDF pattern for use later. When the print dialogue initially comes up, choose the "Page Setup" button to change the printer or any other print options, otherwise it uses your default printer.
Rotary Cutting
Block 1: Cut 8.5" x 4.5" trunk --note direction of wood grain so that it is vertical.
Block 8: Cut 8.5" x 8.5" sky
Templates
To simplify the piecing and yet give the branch some movement, I used this template technique to just reverse a block image
Block 2 and 6 are template pieced (REVERSE--flip it so that you are using the template shape on the side without the printing), Block 3 and 5 are templates as printed.
Paper Pieced

Blocks 4 and 7 are paper pieced. Foundation patterns are included in the download. Use unprinted newsprint or specialty foundation papers. Shorten your stitch length when stitching on paper just to make it easier to remove it (if you normally stitch 2.5, then stitch these 2). Pay attention when joining the leaf corner and the petals. Put pins through the paper and fabric at the join spots. Use another pin to angle in sideways to hold the two pieces together until you can get them stitched down. If you try to use the pin that you put in vertically and then rotate it, the fabric layers will slide. Remove the vertical pin before stitching.
Add the yellow center after joining two petals.


I did not use an iron to press as I went ...just finger pressed--more an issue of time. Take your time and press (up and down, don't slide the iron) it as you go and it will be much flatter. This will get pressed before quilting, but these photos were taken before that step.
Examples of fanning the many pieces that come together at the center. The paper has not yet been removed in these photos. Once the entire row is assembled you can remove the paper. This fanning technique is also discussed in detail in our book You Can Quilt!
Note Block 4 requires a rotary cut 4.5" x 4.5" sky to be added to the 4" finished dogwood flower, then add the paper pieced lower branch to complete the block.
There is plenty of negative space in this row to add additional branches and dogwood in the quilting. Perhaps in your row you want to just do repeated dogwood flowers in 4" or 8" sizes rather than creating this 'branch' concept. Up to you! You have the pattern now so feel free to be creative.
I just might have it quilted into a finished wall hanging by the end of this RAL --think about those spaces above wide doorways, sliders or French doors, etc....maybe a seasonal wall hanging of this shape would work well there. I'll be sure to blog about it and add it to the Flickr group when I do, so I hope you'll choose to follow along.
There is an
EQ support group for this Row-a-long. Feel free to ask questions here in the comments or there on Facebook and post your photos in the
Flickr group too.
If you have EQ I hope you'll give it a try to draw one yourself, but if you'd like the .PJ7 file please indicate in a comment below and I'll send it to you --BUT YOU MUST BE SURE YOUR EMAIL IS PART OF THE COMMENT OR KNOW that you are NOT a no-reply blogger. Several have asked, but there is no way for me to send it to you because you are a no-reply blogger. Here is the Dogwood Branch PDF for those who don't have EQ. These will be available for free through (Oct. 12, 2015). OFFER HAS NOW EXPIRED.
I have numbered the foundations according to how I would like the seams to lie ultimately when I am quilting it. You'll find in EQ that the default does not take that into consideration necessarily. A great opportunity to learn about numbering your own foundations. When in the foundation pattern print dialogue, the sections tab lets you define the entire section--not all sections have to be identified if they are repeating--just print more pages--this can help if you find them spreading over multiple pages. Get a section that is repeated sorted properly and just print it multiple times. Then go to the 'numbering tab' and renumber if you need to. The options tab lets you define the line width, Font button at the bottom of the window lets you define the font type and size for a variety of elements on the page. I also had problems when 'creating a PDF by printing to a PDF', that when I try to print it to paper, the seam allowances don't show. If I select 'advanced' in the dialogue box when printing the PDF (not when creating it, but actually printing it) then click the box that says 'Print as image' then the seam allowances do print. It could be just my printer, but wanted to share that little tip in case you find the seam allowances didn't print. You also need to be sure that it is set to NOT SCALE (Auto-rotate and center is ok). Updated 9/2/15.
Now available via PDF download from Craftsy.
I only have a couple of kits with the exact same trunk fabric, but I have a variety of other suitable trunk fabrics available if that is not of a worry to you. Send $20 via paypal (
marlene@kissedquilts.com) and be sure to include your shipping address -- it will include printed pattern on appropriate papers for templates and paper piecing, fabric kit and shipping. The first two payments submitted via paypal, will get the original Stonehenge Woodland and one lucky winner from comments left on this blog will get it for free.
Three other randomly chosen winners will receive these giveaways via this blog post and I'm using Rafflecopter to track entries (first time for this, so hope it all works) -- A gift certificate from the Fat Quarter Shop, my new book "You Can Quilt: Building Skills for Beginners" (I co-authored this with Leila Gardunia from ) and a kit to make this row just like mine. This will end on Sept. 8 and winners will be announced! We've been recommended to do individual rafflecopter tools for each giveaway, so choose the ones you would like to win and click through on each one. Some have more entry opportunities than others.
Thanks for stopping by and I hope to see some of your fabulous creations! Note there are three different giveaways that are from this blog only and two others that are consolidated from all blogs today, be sure to enter all or at least the ones you're interested in, click through to each one separately. There are also giveaways through all the participating blog posts, so you'll want to be sure to visit all of them. The RAL goes through Oct. 6.
The others posting today are:
https://stofgenoeg.wordpress.com/ Stof Genoeg - 2" Filler Row
http://www.beaquilter.com/ - Be A Quilter - Filler Row
http://quiltartdesigns.blogspot.com/ - Quilt Art - Fall
http://thimblemouseandspouse.blogspot.com/ - ThimbleMouse - Winter
http://www.quiltingqueenonline.com/ - The Quilting Queen Online - Summer
Note...each week for 6 weeks there will be new rows revealed. Be sure to check the
complete schedule for all links. There is a huge giveaway during the 'show me' phase at the end. You won't want to miss it!
My three giveaways:
You Can Quilt! $24.95 value
Fabric kit to make this row - $12 value
The Fat Quarter Shop
You can only enter once at this blog.
While this giveaway is specific to this blog, you can enter at each featured blog today.
There is 1 giveaway for each featured blog of the day.
Entries accepted until September 08, 2015
Winners Announced September 09, 2015
$25.00 gift certificate
Consolidated giveaways coming from all blogs today:
Northcott Fabrics
is giving 1 lucky recipient, 6-8 pieces of fabric at 1 yard lengths each.
You may only enter once
In other words, if you enter it here, do not enter it at the other blogs.
This giveaway is at all the featured blogs today.
Entries accepted until September 08, 2015
Winners Announced September 09, 2015
Value $60-80.00
Northcott Fabrics Big giveaway
As An Incentive To Participate By Making Blocks and Rows
Craftsy Class of your Choice
Value $40.00 based on average cost of Quilting classes,
but the value goes up if you choose lets say a sewing class.
3 individual winners
and
Nancy's Notions
2 individual winners
$10.00 gift certificate
When you add a unique block/row to the Flickr Group that you've created from any of the patterns offered each
week, you will get one entry into the drawing.
You can enter at any blog featuring the Flickr giveaway once each day of this Row-A-Long until
October 13, 2015 when the giveaway closes.
Winners Announced October 14, 2015
If you enter both giveaways, you need 2 unique blocks per each day you enter.
Duplicate Entries will be checked and if found you will be disqualified.
Filler Rows Do Not Count. These to will be disqualified if entered.
a Rafflecopter giveaway
If you're still reading....next blog hop starts October 9.
It will be all about our book,
You Can Quilt!, and beautiful Island Batik fabrics. Set the calendar to come back and be inspired!


 I started with 4 blocks that were part of two different downloads
 - Sunflower

 The intended use is as a table topper, so I tossed the leaves and rotated all blocks so that their 'base' was on the outer edge.
 I used maybe a tablespoon or so of Dawn and put it in the washer to soak for a few minutes then let the delicate cycle continue. I then threw it in the dryer for about 20 minutes and wah lah! it looked fantastic.