Wednesday, October 31, 2012

WIP

Finished
2012-#14 - Working with What You've Got (just needed the binding and it is done now!) The last photo taken was on a sunny day.....it will have to suffice for now.


Progress

2012-#15 - McCall's 2012 Mystery - this version  is being called "Spring Fling" -- quilted, just needs binding, but forgot half of the binding at home (I'm squatting at the rental at my husband's job site in order to get the internet/phone/tv hooked up).


2012-#16 - WWCHS - fully assembled, ready for quilting. Plan to do some fancy purple quiltings in the white corners of the border.


Out of the Darkness -- block #9 - Poppy


Continued piecing the backing for McCall's Mystery--version #2; a bit of improv piecing of the leftovers from this quilt and another quilt that I used the same line of fabric. Lesson learned--using your walking foot to do regular piecing is NOT a good idea. This backing still needs an iron and then I can quilt it! I'll actually load it sideways based on how you are seeing it in this photo.


No Progress
  • Alaska 2007 Shop Hop, ready for Block #9
  • Honeymoon Storm at Sea
  • Oddie’s Wild Nature (O.W.N.)
  • Snowflake BOM win/Blizzard quilt
  • Fall Wallhanging

Ready to Quilt
  • We Can Do It! Skill Builder Sampler
  • Rose of Sharon Bird Block Wallhanging - 'Rose of Hope'
  • Irena Bluhm - colored pencil class project
  • WWVQG 2006 Basket BOM

2012 WIP Stats:
Completed: 14
In Progress: 13

Check out other WIPs at Lee's Freshly Pieced Linkup. Click the button to the right.

Wednesday, October 10, 2012

WIP

Finished

2012 #13 - STEP on Life's Journey


Progress

2012 #14 - Working with What You've Got --just needs a binding now. The signature blocks were presented to me after serving as co-chair for the Walla Walla Valley Quilt Guild in 2009. Earlier that year, upon my marriage, members contributed to a basket of fat quarters. I've used pieces of the fat quarters and the signature blocks (and a bit from my own stash) to create a scrapwork version of our guild's logo. The framing around it allowed the redish blocks to fit in too. I've quilted significant elements which include houses (we annual create a Habitat for Humanity quilt), hearts and flowers (we create hearts and flower blocks and assemble quilts for members when a life altering event occurs), other awareness groups like breast cancer, etc. so there is a ribbon at the upper left corner of the red border and a ribbon all the way around the small black border.

Skill Builder Sampler - the rivets were added, backing is ready, it is now ready to quilt.

WWCHS top all remaining bits (including 2 contingency blocks) are cut, still thinking I might get more in the mail. Will put sewing this together off as long as I can and wait for a required piecing day that is coming up when I go to visit my husband at his new work location. I'm excited to quilt something fun in the white border corners.

Started
From last week's SewCalGal's Fall EQ Blog Hop, I wrote some tips on using orphan blocks and creating a Fall Wallhanging. This is a 'technical' start .....not sure when I'll get back to it, but oh well.

No Progress
  • Out of the Darkness -- ready for block #9
  • Alaska 2007 Shop Hop --ready to do block #9
  • Honeymoon Storm at Sea
  • Oddie’s Wild Nature (O.W.N.)
  • Snowflake BOM win/Blizzard quilt
Ready to Quilt
  • McCall's Mystery - Spring Time
  • McCall's Mystery - Hot Jazz
  • Rose of Sharon Bird Block Wallhanging - 'Rose of Hope'
  • Irena Bluhm - colored pencil class project
  • WWVQG 2006 Basket BOM

2012 WIP Stats:
Completed: 13
In Progress: 14

Check out other WIP's at Freshly Pieced

Tuesday, October 9, 2012

Giveaway Results

Thank you to everyone who hopped along on the SewCalGal hosted, EQ Fall Blog Hop.

In my giveaway, I asked you to tell me how you'd use the We Can Do It! poster.

I personally printed it on cotton sateen and used the BubbleJet 2000 products for pre-treating and rinsing.

Comments mostly indicated the readers would use it in a wallhanging, i.e. in your sewing room.

One said they'd make it into a wallhanging and put it up in the elementary school library to "see the reactions and predictions about who and why she is in this poster."

Another would use the We Can Do It! poster in a banner to take along on retreat.

I especially liked the last two comments because of how it will impact even more people in such different ways. So, I'm going to award two giveaways!

My original is going to go to "Karen in Breezy Point".

And, a second panel, which has not been rinsed and I'd recommend that it NOT be unless you want to 'antique' it. Perhaps you can put textile medium on it and see if it will maintain the vibrancy of the colors when washing it. This one will go to "Barb and Sharon".

Emails have been sent to these winners. Congratulations!!

Thank you everyone who participated!


Monday, October 8, 2012

{Sew} Modern / Design Wall / BOM's Away Monday

My finish is a scrappy random strip HST. This was a swap with my small Fearless Design group and two of the members gave me all of their blocks as well. I started making shapes on the design wall and then tried to connect them. I'm calling this "STEP on Life's Journey". Our local STEP women's shelter will be receiving this one. I had some fabric of antique postcards that I used in the binding. The fabric's name was "Life's Journey", so that helped me finalize on the name of this quilt. The backing is mostly a 'meadow' with a bit of a horizon with clouds in the sky and the right is the trunk of a tree --ok, use your imagination a little bit ;-) I quilted this with a squiggly cross-hatch. The grid pattern of the piecing made it very easy to follow freehand and made it very fast. I even did this without my stitch regulator which made it even faster! I used YLI thread, 'parchment' color and wool batting scraps pieced together.


My Design Wall is my latest Fall Wallhanging. There is an EQ tutorial with some fun tips as part of SewCalGal's Fall EQ BlogHop that wrapped last week. My giveaway is open through Monday, Oct. 8, 2012 at 9p PST.


My BOM's Away progress includes getting the rivets added to the border of my Skill Builder Sampler. It is now ready to quilt!


More {Sew} Modern Monday finishes at CanoeRidgeCreations

More Design Walls at Patchwork Times

More BOM's Away progress at WhataHoot

Thursday, October 4, 2012

Thanksgiving Wallhanging - EQ7 Tutorial & a Giveaway


As part of SewCalGal's EQ7 Fall Blog Hop I'm excited to welcome you to my blog today. The past couple of weeks have involved considering a move to Grand Coulee, WA area. I'll continue to post about that progress and the DIY projects we'll likely be doing on both a residential and commercial property in the very near future! I hope you'll follow along.

For years, I've had a couple of blocks that have been set aside from various block lotto events in our guild awaiting to become a fall wallhanging. I decided with this week's blog hop theme it was time to get them out and see what I might do in EQ7 with them to create a simple wallhanging.


I made the corn block, and probably swapped an orphan block of my own for the pumpkin block.


Creating a new project in EQ, I then took photos of them, imported them to EQ by using
--> Worktable --> Work on Image -->Image Import-->Zoom Fit (the image was way too big to be seen in its entirety on my screen)

Then select the crop tool (left menu bar), move the scissors on each side to crop your image, then click on the checkmark surrounded by green to complete the crop. Then save to Sketchbook. 
(Image ->-Add to Sketchbook)

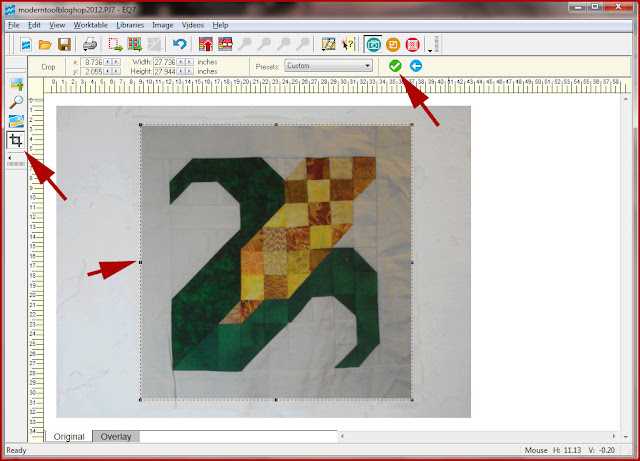
You don't need to have Photoshop to manipulate your photos for use within EQ. Utilize the image tools available right within EQ.

Follow the above sequence for each block.

Now, I want to put them into a small wallhanging, so I created a new horizontal quilt.
Quilt - New Quilt -- Horizontal
2 horizontal, 2 vertical, 12" blocks

Now I can 'Set Photo' from the image icon (right menu) as if the photos were blocks.

NOTE--> this is how you add photos of finished blocks to a large sampler quilt that you might put together over time. This allows you to create a quick image of the individual blocks put together or progress points along the way.


Now I need some more fall themed blocks, so I used Libraries-->Block Library, then click Search, 'by Category', Holidays, select Halloween and Thanksgiving, and there were a few results. You can also Search, 'by Notecard' for a specific word, i.e. turkey or pumpkin.

Adding to the two blocks above, I decided on a pilgrim's hat block and a turkey block. There is a turkey block in EQ and I found a pilgrim's hat in Linda Causee's 365 Foundation Quilt Blocks. They are organized by month, so I went to November and decided the best fit what I was trying to achieve.  I could take the block pattern to a copy machine and enlarge it, or re-draft it and print it out the size that I want. By drawing it in EQ, I can play with the layout of the quilt and ultimately decide what size would be best.

To precisely draw it, take a photo and load it in as a Tracing Image in Block draw. But I chose to just eyeball the Pilgrim's Hat and re-draft it. Since I intend to paper piece it, it doesn't need to be exactly the same.


Here is my quick draft of a Pilgraim's Hat


Below is a re-draw because I decided I wanted a more consistent spacing all the way around the hat to echo the corn block.


Block--New Block--Easy Draw

By looking at the distinct sections, I drew those lines first, then filled in the subsection lines.

Then click on the 'Color' tab at the bottom and proceed to color the block. This also helps you check to be sure you got all the lines connected as you drew it. When ready to make the block, use the
File-->Print --> Foundation Pattern. You can 'move' the sections around in the preview to minimize the number of pages used to print one section.

Now add the turkey and the pilgrim hat block to the quilt.


Looking at the fabrics I had stashed to work with this fall wallhanging, I have a yard for the backing, and two half yards of a green print with turkeys and a black print with pumpkins. I also have a large print of pumpkins and corn and other vegetables. If I can use a larger piece of the large print, it would coordinate nicely.

I'm going to add simple borders, but I want to point out some fun ideas you might experiment with by using the Borders icon. It might not be visible, so 'add buttons' the arrow at the bottom of the right hand tool bar will allow you to add or remove buttons. The defaults of the program do not include several of the buttons, one is a borders button, that you just need to 'add' to the toolbar, in other words, make it visible. Clicking on the icon will give you another window that you can choose from the pickdown menu various styles, and ultimately select a particular border and it will autofill it in. You can then adjust the particulars of the border through the border tab and make colorations to please your design eye.

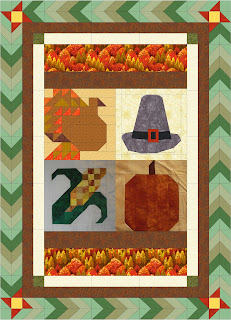
Sample of a fun border treatment. I have done a 'right click' with my mouse on the quilt and turned off the Outline Patches and Outline Blocks so it looks more like it would when pieced together.

What I'll go with, based on the fabrics I have in my stash is a simpler border.

This one just might be doable in short order.


I promised a giveaway. Utilizing the same idea of the photos of finished blocks, etc. The last few months I have been working on the We Can Do It! Skill Builder Sampler hosted by Sewn by Leila. I pushed the idea a little further and printed on cotton sateen the original We Can Do It! poster. I am giving away my 'rinsed' version that I personally printed, which now looks quite antiquish. It measures about 24"x31"

To enter, leave a comment telling me what you'd do with the fabric version of this poster. If you're interested in getting a vibrant colored one printed by Spoonflower, let me know. Be sure that appropriate contact information is included so that I can reach you if you're the lucky winner!

Entries for the giveaway will be taken until Monday, October 8, 2012, 9pm Pacific Time.

I have written several other EQ Tutorials that can be found by clicking on the EQ Tutorials tab at the top of the blog page.

Thank you for stopping by! I hope you've enjoyed seeing a few features of EQ that will inspire you to design something yourself. Take a moment and enjoy the fall colors in your area this season.

The lineup for the week on the EQ Blog Hop is: 

Monday, Oct lst SewCalGal
Beaquilter

Tuesday, Oct 2nd Marjorie's Quilting Bee
Curious Orange Cat

Wed., Oct 3rd Love Bug Studios

Thursday, Oct 4th Kissed Quilts --you're here!
Bits & Pieces

Friday, Oct 5th I Quilt Scarlett & Grey

EQ Blog: http://www.doyoueq.com/blog/
A special thanks to SewCalGal for organizing such a fun week!


Wednesday, October 3, 2012

WIP


A brief status update, but before you look, tomorrow I'm blogging as part of the EQ7 - Sew Cal Gal hosted Blog Hop. Hope you'll stop by to check it out and be inspired with a fall themed tutorial.

I've been busy dealing with moving logistics and shop hopping around North Central Washington last week and this week 'Hop the Blues' in Eastern Washington and Oregon.

With just short bursts of time, I continue to hone my skills turning my stitch regulator off and quilting baby quilts for charity. Another quilter in my small group agreed to utilize fabric that I had and piece tops together. I don't count these in my WIP, but part of my practicing for my business.

Here are two I did this week.

This quilt had 'Dick and Jane' fabric and alphabet letters, so I stitched a continuous alphabet and returned with a squiggle above the line of letters that allowed me to cross the t and dot the i and j. Wherever I got to in the alphabet at the end of the line, I just continued on the next line.


This one I tried to draw a repeating Mickey Mouse ears, but I just couldn't get something I felt good about, so went with a sort of baseball allover that I made up myself.


Progress

- Out of the Darkness Block #8 is done! and #9 is cut out.

No Progress
  • SBS
  • WWCHS (well, 2 more blocks showed up, expecting one more envelope)
  • Alaska 2007 Shop Hop --ready to do block #9
  • Honeymoon Storm at Sea
  • Oddie’s Wild Nature (O.W.N.)
  • Snowflake BOM win/Blizzard quilt
Ready to Quilt
  • Roman Stripes
  • Working With What You've Got
  • McCall's Mystery - Spring Time
  • McCall's Mystery - Hot Jazz
  • Rose of Sharon Bird Block Wallhanging - 'Rose of Hope'
  • Irena Bluhm - colored pencil class project
  • WWVQG 2006 Basket BOM

2012 WIP Stats:
Completed: 12
In Progress: 14

Check out other WIP's at Freshly Pieced

Monday, October 1, 2012

Design Wall / BOM's Away Monday

After surviving the first week in a new job, my hubby is back at Grand Coulee this week with a few critical essentials so he can survive in a rented duplex while we figure out more permanent accomodations. Just imagine an entirely full Expedition with the mattress and box springs tied to the top. I was too emotional to think of taking a photo. Exciting times ahead. Right now, I'm just trying to keep in mind that every bit of change is a new opportunity!

He did text me a photo of the room he setup. I almost cried. I am the luckiest girl to have found so late in my life such a wonderful untaken man!

Design Wall -- 2 more blocks arrived. I've been waiting 2 weeks for the last few to come from Georgia (United States), but alas they are still not here. Hmmmmm. I'm excited about my border ideas and hope the Walla Walla Children's Home Society will be able to utilize this to its greater good when it is finished.


BOM's Away Update
Here is #8 on the Out of the Darkness quilt (by Pam Bono).
Spring Bouquet.


I did finish cutting out #9.


Be sure to stop by on Thursday during this week's Fall Themed EQ Blog Hop. I'll be posting another EQ7 Tutorial and will have a giveaway.

Last Thursday and Friday I went on the North Central Washington Quilt Shop Hop...10 shops in two days! Whooo!! I posted on Facebook the fronts of the stores and made a brief comment about each. It is still happening through Sat. Each shop issued the directions for a 'row' of a 'row quilt'. Some made their individual row into a table topper, others repeated the same row into a quilt, and others combined rows they felt worked together. One even added applique and said...it was a work in progress still. All sorts of options for sure. I think it could be made into a nice row by row scene. I must admit I was doing a bit of research in the region of where my husband is now working. Once the hop is over, I'll post photos of the row patterns and what the shops did with them. I am missing three shops of photos, so will try to get some visuals on those in the mean time.

This Wed. starts my own local Shop Hop the Blues and runs through Sunday. My small group will carpool on this one on Wed. and Thurs. to get around and see what is the latest and collect whatever they have come up with for us. We will do a 1 car 'long-haul' day and a 2 car short-haul day to make it workable and stay in our own homes overnight as well as accomodate some schedules that can't get away on the long-haul. Should be a good time!

Two quilt shops within these regions are in the process of closing. Sad in so many ways, but I wish the owners the best in their new endeavors. The Quilt Crossing in Odessa and Village Quiltworks in Richland. For the bargain shopper....worth checking them out, and I've just learned that Highland Quilts in Athena is having a big 5th Birthday sale. With unique sales each week in addition to the sales for the whole month. Details on their Facebook page.

More Design Wall Viewings and BOM's Away Progress Updates.