
Download the Free 2011 BOM Collection and link to your EQ8 Library.
Click here on how to link it up with EQ.
Don't have EQ8? Download the pattern software!
Here are the 12 blocks that I created.
 |
 |
 |
| January Jumble | February Frolic | March Medley |
 |
 |
 |
| April Accord | May Merriment | June Jigsaw |
 |
 |
 |
| July Journey | August Amusement | September Soother |
 |
 |
 |
| October Opportunity | November Novelty | December Diversion |
I was fortunate and was selected during the month of September and won the Kaleidoscope software add-on.


At the end of 2011, EQ then challenged us to design a layout for the blocks. I had seen this when they initially launched the 2011 BOM. This is what motivated me to get involved.
I went through several ideas, but I kept seeing these as flags and thought it would be fun to have them flying at the end of wind turbine blades. A dodecagon is the shape, if you want to have 12 edges! At one point I had hoped to create a design that mathematically could be defined so that whatever the size of your blocks you could then figure out the pattern. Gave up on that idea.
There are a variety of elements within EQ that I learned new in order to create this layout. In this tutorial I hope to demonstrate or point them out to you so that you can also enjoy these features.
- Circular block design
- Custom Quilt Layout
- Directional fabric manipulation
- Photos as blocks
New Block ...Patch Draw ... Grid--Circle

Using the drawing tool, use the circle gride guidelines to draw a blade.

This blade can then be copied and pasted, and rotated in 30 degree increments. Select the blade using the top arrow on the lefthand side. (click on the arrow) then click on the blade. Use the bluish icons in the upper right 2nd level icon bar to manipulate the images. Clone selected segment (2 blue squares icon upper right (next to the end)). Rotate (far right icon). Once you have an entire quadrant, you can copy all 3 blades, and then rotate on a 90 degree increment and position on the circle accordingly.

Now click on the 'color' tab (not visible in image above) at the lower left side of the workspace. Color the block as you'd like.
Save to sketchbook.
Save the block as a JPG. (File...Export Image).
Create a new block ....Block..New...Easy Draw.
Select the 'Tracing Image' tab at the bottom. From the menu... Block...Import Image for Tracing, the block you just created.
Draw lines from the center along the long edge of the blade to the edge of the block.
Draw the angled edge of the blade. One blade may not hit the grid snaps, but the smaller you make the grid, the more accurate it will become.

Now the color can be placed in the easy draw block and the background can be filled in.
In order to rotate the fabric, the block needs to be placed in the quilt.

On the Layout tab (lower left), choose the size of quilt that you'd like to make.
If you want borders, then select the border tab and add whatever borders you'd like.
Choose the Layer 1 tab and select the Blade block you have created. Note that the blocks shown to select include the original EQ blocks all put into one project file.

Hold the SHIFT key, the pointer will now be cross-hairs instead of an arrow and it allows you to draw the size of the block. Use the entire quilt center as the block. Now that a block is drawn, you can change the block by just selecting a different block and placing it like you typically would place a block in a quilt.
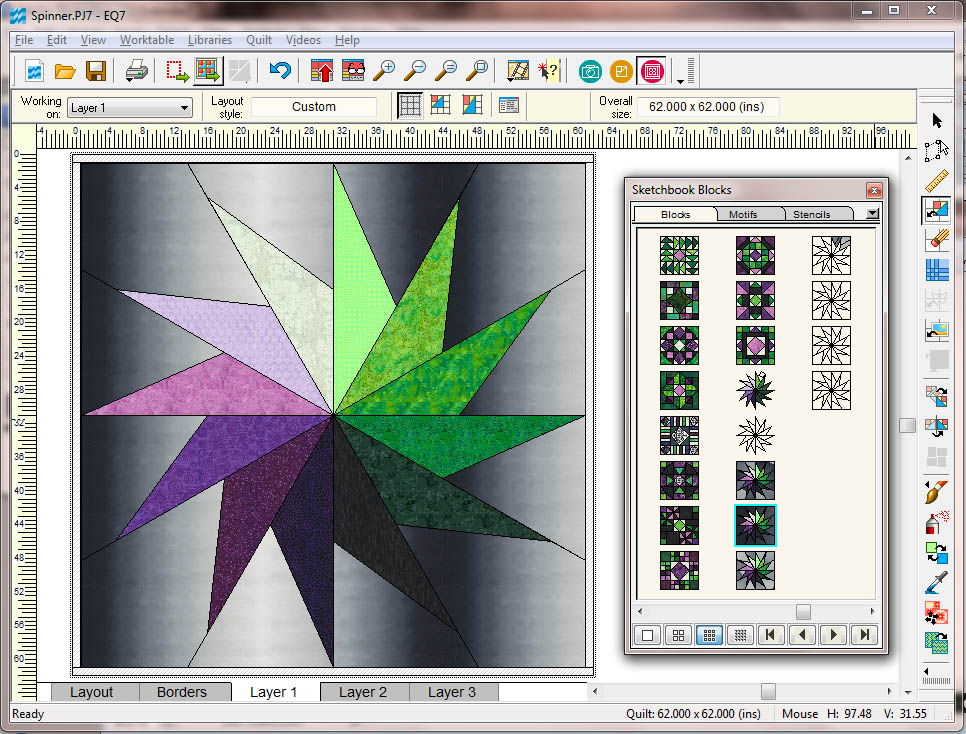
When originally designing this, at this point I wanted to have a glow in the middle of the background and dark on the outside, so went looking for an ombre (the fabric changes from light to dark within the same fabric). In my EQ stash, I found the Serenity Taupe Prints IV by Daiwabo. The notecard explains it is just a small portion, but I quickly used it anyway. If you chose a block that did not have color, you need to now color it with fabric. I designed it as shown, but ultimately decided to put the white and black on the vertical axis and swapped the green and purple sides.
Directional Fabric Manipulation
Here are some variations of how you could set the fabric in the background:


In order to get these effects, you need to understand how to manipulate fabric within EQ.
There are two aspects that are important.
1. The actual fabric swatch definition.
2. Rotating or 'fussy' cutting the fabric.
When looking at the swatch definition, the # of pixels and actual size of the swatch can make a critical difference in how the fabric is represented in your EQ design. Swatches that come with the software or obtained through STASH updates are not necessarily full repeats. You can create one of your own though and import it to the project. I often try to find an image online of the fabric and use that. Find the repeat in the fabric and identify the actual sizing of the fabric. The instructions in the EQ book will tell you the pixel size should be 72-75. I often use Adobe Photoshop to get the pixel size needed and actual size (inches) of the fabric to be sure it is accurate to the real fabric.
If I had fabric with a light to dark sequence that is 21" (width of fabric) then I could see the 'off-point' version (2nd above). If the light to dark sequence is about 15" I might be able to get the 'radiate' version (1st above). Without rotating the fabric, I could get the 'vertical' versions (3rd and 4th above). With experimentation, I chose about an 8" repeat of the fabric to get 6 spirals in the background. I did test with more and less spirals by decreasing and increasing the repeat respectively.

To rotate the fabric --find the 'rotate fabric' icon...if it is not showing up, it is possible that you need to add it to the tool bar. Choose the very bottom icon Add/Remove buttons and be sure the rotate and the fussy cut icons are on the toolbar.
The Rotate Fabric menu that appears after selecting the 'Rotate Fabric' icon allows you to use a simple 90 degree rotation (typical for border prints, etc.) but also an 'Advanced' section that allows you to rotate the fabric on any angle for the first rotation as well as how many rotations within 360 degrees. Since I have 12 sections, I want it to rotate 12 times to make a complete circle. That will allow me to use each 30 degree angle rotation in each of the sections to get an interesting effect to the fabric.
 This caused a spiral effect because the fabric had to repeat within the background section. WOW! How cool...so then I went about the process of figuring out how to make that work in reality and how many spirals I wanted to show up. By changing the width of the repeat you can change the number of spirals. By adjusting every other one to start. This one shows 6 spirals. I found by alternating each background section from starting exactly at a repeat, or half way up, the spiral effect was most pronounced. This also means that two of the same backgrounds have their tip at the start of a repeat, and two of the same backgrounds start half way in the repeat. This helped me when cutting out the background sections from the pieced fabric.
 In order to conserve fabric, I went light to dark in half of the backgrounds and dark to light in the other half. I discovered when using EQ to test this concept that it didn't seem to make a difference in the effect and I was able to more efficiently use the fabric. I chose to change the direction on the vertical axis hoping that it would seem like the lightsource was causing this effect. This one only shows 5 spirals.
I wasn't able to quickly source this fabric, but did have Lumiere Cotton Sateen on hand and used that as it has a similar effect.
But how to set the flags into this design and get a proper pattern?
Photos
The photos of my blocks were imported into EQ so that I have the actual images to use in designing the layout.

Select the Work with Photo (upper ellipse) and then select photo (lefthand ellipse) or from the menu go to Image, Import Image. A browser window is then presented and you can find your photo. Once it is selected it will appear in EQ. Then Add to Sketchbook (from the menu ...Image, Add to Sketchbook) or the sketchbook icon with an up arrow. Repeat this for all photos you want to use in this project.

 Now that all photos are included (you could also use the blocks designed for the contest), go to the Quilt worktable. On layer 1, select 'place block', select the block, then with your SHIFT key down the cross-hairs will appear, and draw a block. Select the 2nd icon on the right, the 'Adjust' icon, and then the 3rd menu/toolbar will fill in. The two eliptical marks on the image below highlight the rotation and size information. With the block selected in the 'adjust' mode, you can size the block i.e. 6.00 and 6.00 (the 6" blocks or if you made 12", select 12.0 and 12.0) and the block will become the size it needs to relative to the entire quilt. Clicking on the block allows you to then move it or rotate it. I drew one and got it sized right. Then cloned it twice. Selecting one of the clones, I rotated it 30 degrees. Selecting the second clone, I rotated it 60 degrees. Now you have each of the 3 blocks needed to repeat around the circle. Copy and move into place.
Adding this binding treatment was an idea at the time of the end of the contest. It didn't end up happening, but this was close to my final concept. I further worked the background fabric settings once I started working with the fabric. The spirals aren't distinct in this setting.
Now...how to piece this together.
1. Make each of the blocks from the EQ 2011 BOM.
2. Print the templates (3 sections of 1 quadrant, repeated 4 times) from the Block Worktable.

Click on the 'delete' button at the top. Select each of the duplicate pieces and then hit the Delete key on your keyboard. You should end up with 3 unique background section pieces and 1 blade. The diagram above was before I deleted any. The 3 background sections are on the far right. The large one is duplicated. The blades show up 4 times. I'm guessing this happens because one is slightly different size and so it thinks it needs a unique template. Click on the 'move' button at the top and move them so you efficiently use the paper. After removing what you don't want and moving stuff close together, there may be 'blank' sheets showing, but it won't actually print them. Carefully cut apart each ajoining sub-section for a template and line up the papers and tape them together to create a template. One blade, 3 background sections.
3. Cut out blade sections from your fabric. This quilt is 60" ...a 1/4 yard for each blade was sufficient.
Fun to now put it up on the design wall and see how you like the color placement. You can even put your flag blocks up now too.


4. Prep the background templates.
a. Draw the 6" square at the end of each blade point on the template. For the section that has the flags/block at position (like a clock)12, 3, 6, and 9 ....the block is in the outer corner. Measure from the inner point to the block and use that measurement for positioning the block on the other two sections. You can also set the blade template next to the background template and see where the end of the blade is to confirm the position.
b. Draw a parallel line, to the long side of the blade, in the adjacent (touching to the long side of the blade) background section that will contain the flag that hangs off of the same blade. This line should be 6" from the edge (or same size as your flag/block).
5. Make background fabric. In order to get the spirals, the ombre repeat was cut in about 8.5" strips and sewn together.
6. Cut background sections using the templates. This part is a bit tedious. I folded the template along the piecing lines (as if it was a foundation ....you could make 4 of each and actually paper piece, but the pieces are so large, it was easy enough to do without the paper. I did each type of background section, all four at once so that I was consistent. For each of the 3 background sections, make 1 with the repeat starting with the light at the center, make 1 with the repeat starting with the dark at the center, make 1 with the repeat starting half way up with the light towards the center, make 1 with the repeat starting half way up with the dark towards the center.
a. Align the template on the 'flag' side on the fabric based on description above. Fold the template on the parallel line and cut with 1/4" seam allowance.
b. Fold at flag piecing line that is closest to the center and cut with 1/4" seam allowance INTO where the flag would have been.
c. Fold at flag piecing line that is furthest from the center and cut with 1/4" seam allowance INTO where the flag would have been. This insures that your background fabric placement remains properly aligned.
d. Sew flag into these two strip pieces.
e. Line up the new strip with the pieced fabric you just cut from and reattach. Using the template, cut the remaining two sides (4 for the corner sections).

7. Sew each background section to the blade within its piece of the pie in the circle.
8. Mark the seam allowance at the center corner of the blade. This is to help the center construction.
9. Sew each sectional to the next sectional, starting or stopping at the center seam allowance rather than sewing all the way to the edge of the fabric.
It should be pretty exciting about now as you look at your design wall and see what you've put together.
10. Quilt -- I used a wool batt and a white cotton batt layered. The wool for loft (on top) and the cotton for draping (underneath). I chose many different colors and threads. This was my plan....it mostly came out that way. The orange 50wt spools being used in the bobbin. Invisifil 100 wt black/smokey color to 'ditch' the blades and the flags; Aurifil 12 wt to outline the ribbon.

These three fills were used and repeated 4 times in the blades. Ocean currents, pebbles, matrix.


I don't know if it was necessary, but I did use two different shades of grey in the background. For any 'light' side of the ribbon it was a lighter shade, and any 'dark' side of the ribbon it was a darker shade. In this photo you can see that I am in progress of doing the 'light' side with a sort of flame echo fill. I wanted to create the idea of movement and wind.


I really debated whether or not to then fill in the ribbon with two very thin threads in two colors, but after the Sharon Schamber class....I learned that 'negative' space of the ribbon was very important to leave blank.
I was so tired at the end of the quilting process, I did a very simple selection of ditch work on the flags and left it at that. They really needed more quilting to be done 'right'.
At this stage, I started in on making the prairie point piped binding and realized there was no way I was going to get it finished in time to complete the quilt and still enter the contest. I took a photo of it as is off the quilting table and submitted it late on the last night. The design and the top was all that was required to enter.

Early the next morning I had an email that I had WON! EQ personnel knew I already had the quilting designs, so asked if there was anything else I'd rather have. I gave them a list and they ultimately chose from that list, items that I'd love to check out and experiment with. I'll definitely be posting about them when I do! ***********Thank you so much EQ! **********

At this point, the intended purpose of this design had been accomplished. But I needed to finish the quilt and use it to learn some more techniques.
I had the great fortune to show it to Sharon Schamber and get her critique.
11. I was advised to add a small green strip as a border ...wondering why and if I should have added this before quilting it or not. I added it. Also NOT to put prairie points on this quilt, this quilt is too classy, was the input. I thought the priarie points kept within the whimsical 'fair' like concept of the quilt, but perhaps the quilting then took it to another level.
12. Now to block it. I had the ideas of soaking it in a tub, in the washing machine, or just spritzing it, then on insulation aboard stretching it to the size that is expected and pinning the sides and letting it dry. I went for a quick soak only in the washing machine and a strong spin to get the water out. Unfortunately I then discovered that at least one and I figured out later two other small bits of fabric had bled i.e. their dye was not set well and it moved onto other fabrics. A black was the primary culprit that was used in the flag blocks and two hand dyed greens that I used in block 12. So--the lesson here...if you intend to wash or even block what you've made, be sure to check the colorfastness of your fabrics--especially batiks. While it was blocking on the insulation board layed out on the floor of the garage, I tried testing other fabric with lemon, vinegar, spot removers, etc. Nothing seemed to really take care of the test fabric bleeds. I ultimately put it in the washer again with 3 color catchers.....to no avail and further bleeding. Well, the show I had intended to put it in was fast approaching, so I just decided to move on and hope it wasn't too noticable. I had to block it a 2nd time and left it to dry over the weekend while we were away. I didn't spin it as hard this time and so it took longer to dry. One of my husband's tools came in very handy when doing the blocking. A laser level....it casts a straight line with the laser which you can then use to line up the edge of your quilt. So cool!
 13. I then added actual piping using Susan Cleveland's Piping Hot Method, along with the binding. I made it extra wide to wrap around the back to cover up the 'add' of that border AFTER the fact, otherwise all my basting and other random stitches over the side of the center would have been seen or I would have had to pick them out. No frogging for me if I can help it. I did use some of Sharon Schamber's techniques in the binding as well. Even stitched the hanging sleeve into the binding, but bgiven Susan's method, I had to stitch it on at the same time the piping went on. Trimmed after applying the piping using Susan's piping trimming tool.
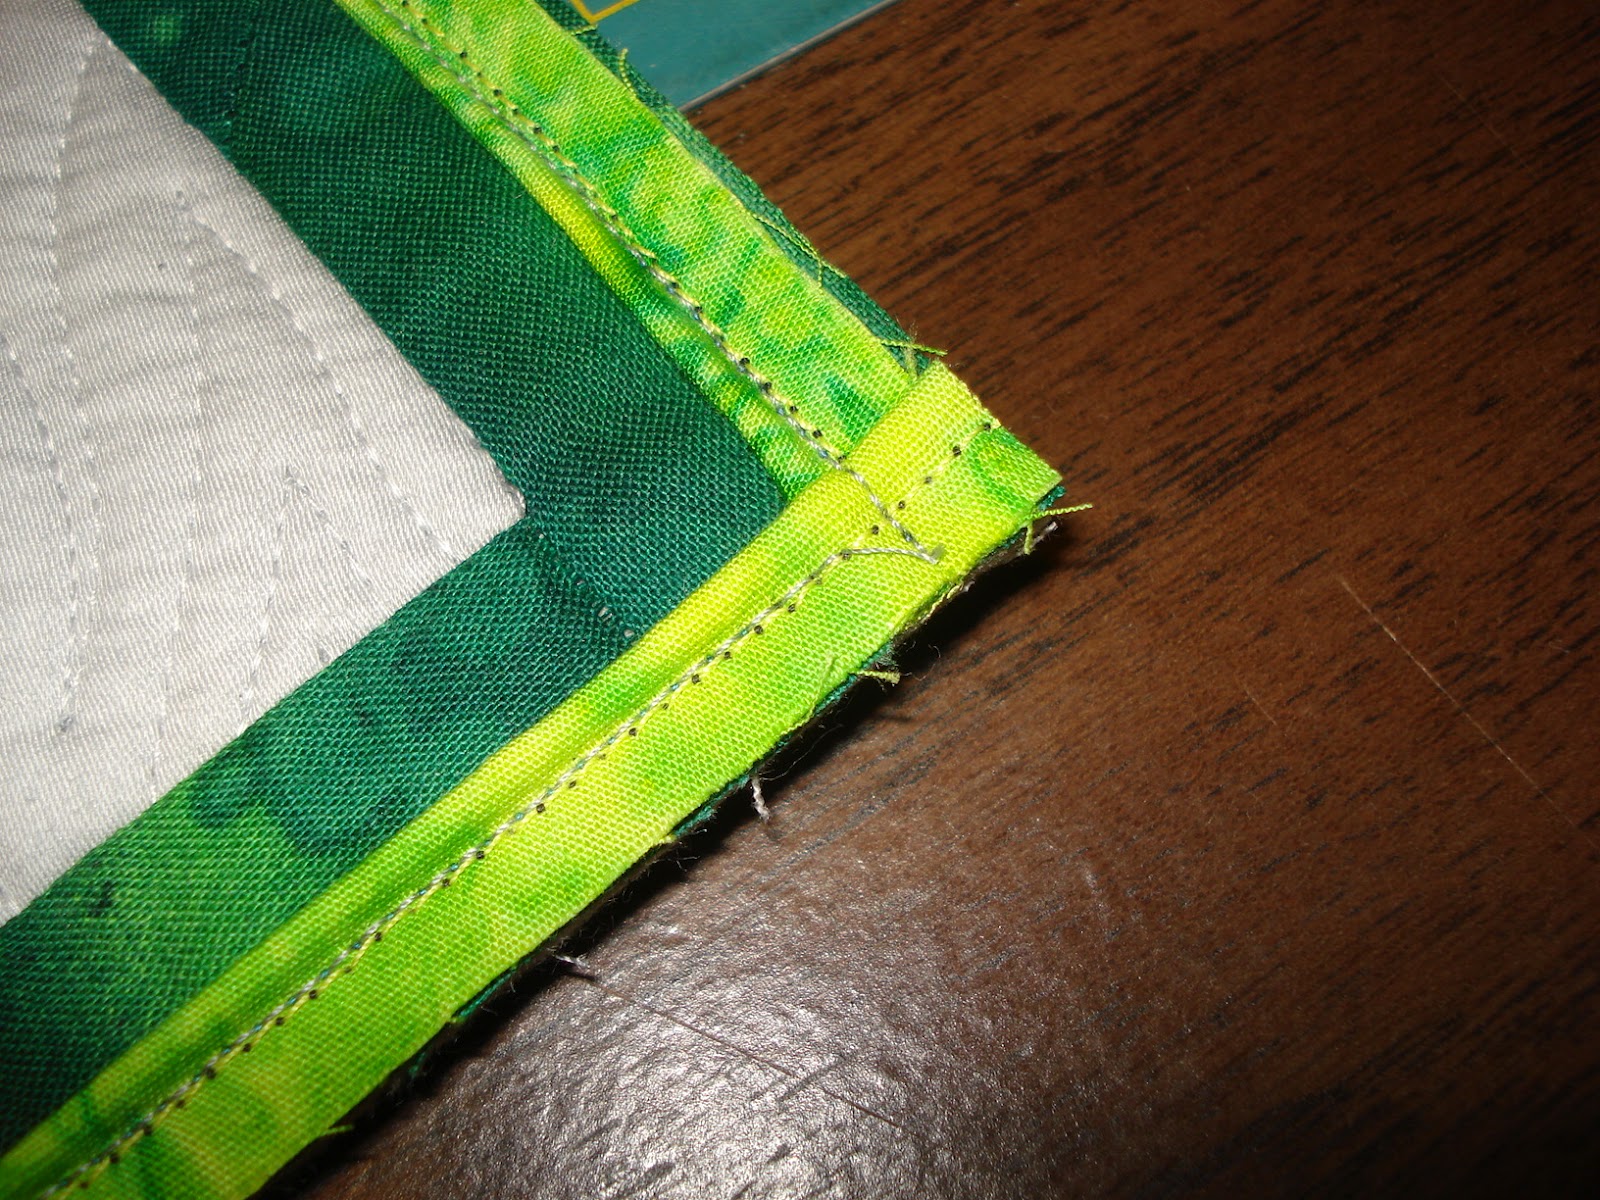
Using glue to secure the binding on the top of the quilt, Susan recommends sewing it from the back of the quilt stitching just inside the piping stitching line.

This worked pretty well. I then used Jackie Robinson's method of stitching down a mitered binding and turned it to the back to hand stitch down. I used my binder clips to keep it folded over tightly. Worked very well.

14. Make a label. I like using Printed Treasures iron on washables that I can print on my inkjet printer.
Oh...did you want my PJ7 file (2.4MB)?
Hope you've enjoyed this journey. If you make one....be sure to send me a photo!


